The DSD Tech HC-06 Bluetooth module is a reliable and widely-used module for wireless serial communication. Designed to function as a Bluetooth slave, it allows easy communication between microcontrollers like Arduino and devices such as smartphones, PCs, or other Bluetooth-enabled systems. Whether you’re building a DIY robot or a smart home solution, proper DSD Tech HC-06 pairing is crucial to get your project running smoothly.
In this guide, we’ll walk through everything you need to know about the DSD Tech HC-06, from initial setup and Bluetooth pairing to troubleshooting and optional configuration using AT commands.
What is the DSD Tech HC-06?
The HC-06 is a Bluetooth Serial Port Protocol (SPP) module that communicates over UART (Universal Asynchronous Receiver/Transmitter). It is a slave-only device, meaning it can be paired with a master device such as a smartphone, computer, or another Bluetooth master module.
The module features:
- Bluetooth 2.0 support
- A typical working voltage of 3.3–5V
- Default baud rate of 9600 bps
- A default pairing name like
HC-06 - A pairing PIN, usually
1234
The DSD Tech HC-06 pairing process is straightforward, making it an ideal module for beginner and intermediate level electronics projects.
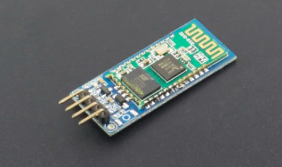
Hardware Overview
The HC-06 Bluetooth module has four pins:
| Pin Name | Function |
|---|---|
| VCC | Power Supply (3.3V to 5V) |
| GND | Ground |
| TXD | Transmit Data (connects to RX of microcontroller) |
| RXD | Receive Data (connects to TX of microcontroller via voltage divider if using 5V logic) |
An onboard LED provides visual feedback about the connection status. When the module is unpaired, the LED blinks rapidly. Once paired, the LED stops blinking and remains solid.
Important: If you’re connecting this module to a 5V Arduino, use a voltage divider on the RX pin of the HC-06 to prevent damage.
Powering the HC-06
Before you can start the DSD Tech HC-06 pairing, you need to power the module correctly:
- Connect VCC to 5V (or 3.3V depending on your setup).
- Connect GND to ground.
- Ensure TXD is connected to RX on your Arduino (or USB-TTL adapter).
- Connect RXD to TX using a voltage divider (two resistors) if you’re using 5V logic.
Once powered, the LED on the HC-06 should begin to blink, indicating that the module is waiting to be paired.
DSD Tech HC-06 Pairing with Smartphone or PC
The DSD Tech HC-06 pairing process with a phone or computer is quite simple. Here’s how it works:
On Smartphone:
- Enable Bluetooth on your phone.
- Scan for nearby devices.
- The HC-06 should appear as
HC-06or a custom name if it’s been configured. - Select the device.
- When prompted for a PIN, enter
1234(or0000if1234doesn’t work). - Once paired, the LED on the HC-06 will stop blinking and turn solid, confirming the connection.
On Windows PC:
- Go to Bluetooth settings and click “Add a device”.
- Choose the HC-06 when it appears.
- Enter the pairing PIN (
1234). - After pairing, go to “Devices and Printers” and note the COM port assigned to the HC-06.
- Use a terminal program (like Tera Term or PuTTY) to open the correct COM port at 9600 bps.
Testing the Bluetooth Connection
Once DSD Tech HC-06 pairing is complete, it’s time to test the communication. The module communicates through UART, so you’ll need a serial terminal or microcontroller.
- Open a serial monitor or Bluetooth terminal app.
- Set the baud rate to
9600. - Send any message — you should receive a response if your hardware is correctly connected.
- On Arduino, write a simple sketch that reads serial input and toggles an LED or sends a response.
For example, in Arduino:
cppCopyEdit#include <SoftwareSerial.h>

SoftwareSerial BT(10, 11); // RX, TX

void setup() {
  BT.begin(9600);
  Serial.begin(9600);
}

void loop() {
  if (BT.available()) {
    char data = BT.read();
    Serial.println(data);
  }
}
Upload this code and communicate via the HC-06 using your smartphone. You’ll see responses in the Arduino Serial Monitor.
Using AT Commands for Configuration (Optional)
If you want to change the name, PIN, or baud rate of your HC-06 module, you can do so using AT commands. Note that the module must not be paired during this process.
Steps:
- Disconnect the module from Bluetooth if already paired.
- Open your terminal program (like Arduino Serial Monitor or Tera Term).
- Set the baud rate to
9600, with “No Line Ending” or “Both NL & CR” depending on your module. - Type
ATand press Enter — you should get a responseOK. - Use the following commands:
AT+NAMEYourDevice— changes the Bluetooth nameAT+PIN1234— sets a new PINAT+BAUD4— sets baud rate to 9600 (values vary by firmware)
Here’s a quick reference table for AT configuration:
| Command | Function |
|---|---|
AT | Check connection |
AT+NAMEname | Change module name |
AT+PINxxxx | Change PIN |
AT+BAUDx | Change baud rate |
AT+VERSION | Get firmware version |
After configuring, restart the module and re-pair it with your device.
Troubleshooting Common Issues
Even though DSD Tech HC-06 pairing is straightforward, issues may arise. Here are some common problems and their fixes:
- HC-06 not visible on scan: Ensure the module is powered and LED is blinking. Check wiring.
- PIN not accepted: Double-check whether the default PIN is
1234or0000. Some clones require123456. - AT commands not working: Make sure the module is not connected to any device via Bluetooth during configuration. Also, verify your terminal settings.
- No data transmission: Confirm baud rates match, and connections (TX/RX) are correctly wired.
Use Cases and Practical Applications
The HC-06 is a versatile module used in:
- Remote-controlled cars and robots
- Wireless sensor data collection
- Home automation systems
- Arduino Bluetooth projects
- Remote serial monitoring or control systems
With successful DSD Tech HC-06 pairing, you open the door to a wide range of Bluetooth-based projects.
Summary
To summarize the process of DSD Tech HC-06 pairing:
- Power the module properly and ensure the LED is blinking.
- Pair with your smartphone or PC using the default PIN.
- Use the correct COM port and baud rate for serial communication.
- Optionally, use AT commands to rename, change PIN, or modify baud rate.
- Troubleshoot with LED status and terminal feedback.
This module’s simplicity and reliability make it an excellent choice for wireless serial communication in DIY projects. With this complete guide, you should now be well-equipped to work with the DSD Tech HC-06 module from start to finish.
FAQs
1. What is the default name and PIN for DSD Tech HC-06?
The default name is usually “HC-06” and the PIN is “1234”. If this doesn’t work, try “0000” or consult your module’s datasheet.
2. Can I pair multiple devices with the HC-06 simultaneously?
No, the HC-06 is a slave device and supports only one active connection at a time.
3. Do I need level shifting when using HC-06 with Arduino?
Yes, for the RX pin of HC-06, a voltage divider is recommended if you’re using 5V logic (like on Arduino Uno).
4. How do I know if the HC-06 is successfully paired?
The onboard LED will stop blinking and stay lit solid once paired successfully.
5. Can I rename the HC-06 module?
Yes, using AT commands like AT+NAMEYourName when the module is not paired.